Add Traction to Accessibility Ramp and More
In Canada, there were 653,808 ED visits reported for injury after unintentional falls in Canada, accounting for 32% of all reported ED visits for injury and trauma. By adding extra traction to otherwise slippery surfaces, ABATRON’s Tread Spread can help reduce the likelihood of an accident. Perfect for concrete, wood, metal, fiberglass, and more, Abatron’s Tread Spread epoxy coating exceeds OSHA and ADA recommendations for slip resistance, excels in wet or dry conditions, and is easy and cost-effective to apply.
After
a frigid winter scraping ice and snow off their accessibility ramp, the
homeowners looked for a durable product to improve its traction. (The
tape they applied previously failed early in the season.) When they
learned about TREAD SPREAD™, a slip-resistant epoxy coating, they decided to give it a try.
Abatron captured the project on video for their YouTube channel. Below is a step-by-step description of how TREAD SPREAD was applied.
Marking off stencil location.
1. Surface preparation. The
surface must be clean and dry prior to application. There should be no
oils, grease, paint, stains or debris. Stains or sealants that cannot be
removed easily can be sanded.
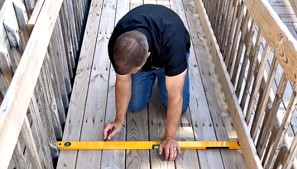
2. Measure and mark off a stencil area. Think about how the finished application will look. A sketchpad can help. Then measure and mark off the location of each stencil.

Sanding the application surface.
3. Roughen the surface. Roughen the surface of the application area by sanding. This helps TREAD SPREAD to bond more effectively to the substrate. Be sure to sweep away any dust or debris afterward.

Taping off the stencil.
4. Tape off a stencil of the application area.
Use painter’s tape to mask off a stencil area. Wider tapes will offer
greater protection against accidental contact with the epoxy. The
surface must be clean and dry before the tape is applied.

Left: Use separate utensils for portioning and mixing. Right: Mixing TREAD SPREAD.

Applying Tread Spread.
5. Prepare TREAD SPREAD for use.
Use separate utensils to portion Part A, Part B, and for mixing. Use an
empty, clean container to stir the product. Prepare an amount that can
be applied in under ten minutes. The larger the batch, the more quickly
it will harden. Blend until the color is uniform.
6. Apply TREAD SPREAD. Use a putty knife or trowel to apply TREAD SPREAD. Create even layers when spreading the coating.

Removing tape stencil.
7. Remove tape stencil. Slowly remove the tape stencil while TREAD SPREAD is still wet.

Hardened TREAD SPREAD.
8. Allow for hardening time. It will take TREAD SPREAD
60 – 90 minutes to harden. In warm weather, it will harden much faster.
For best results, allow the product to harden overnight.
To watch a short video of how this project was done, visit our Abatron YouTube channel. To learn more about TREAD SPREAD and for ordering information, click here.


Comments
Post a Comment